This is a friendly Windows utility including about all the features
of the 5250 utility.
This Windows utility was developed by
Jonas Temple,jtemple@innovativesys.net.
To install this utility:
- Copy iSeries IFS file
/mmail/winMMail/MIMEMailV140.zip
to a directory of your Windows computer
| |
Note-
If you have already installed the AS/400 library
MMAIL, and you just want
to download the latest version of this Window utility:
- press this link to download the zip file
- perform the installation as per the following steps no. ii) and iii)
- replace member WSENDMAIL in source file MMAIL/QRPGLESRC with the contents of file wsendmail.rpgle (exploded from the zip file)
- run the following commands
- ADDLIBLE MMAIL
- CRTRPGMOD MODULE(MMAIL/WSENDMAIL) SRCFILE(MMAIL/QRPGLESRC)
SRCMBR(WSENDMAIL) DBGVIEW(*SOURCE)
- CRTSRVPGM SRVPGM(MMAIL/WSENDMAIL) MODULE(MMAIL/WSENDMAIL)
EXPORT(*ALL) SRCFILE(MMAIL/QSRVSRC) OPTION(*DUPPROC)
|
- Unzip this file. You will obtain the following files:
- iSeries.ico
- MIMEMail.chm
- mimemail.exe
- setup.exe
- wsendmail.rpgle
- click on file setup.exe to install this utility on your PC.
Highlights
- Requirements
- iSeries library MMAIL
- IBM iSeries Access for Windows
Operating the Windows utility
- Starting the utility
- Working with the Address Repository
- Working with MIME Files Repository
- Creating a MIME File
- Sending a MIME File
1. Starting the utility
- Start OpsNav
- Right-click the system you're trying to connect to
- Select "Properties" from the popup menu
- On the resulting dialog, select the "Connection" tab
- Under the "Signon Information" section, select the "Use default
user ID, prompt as needed" radio button.
- Click "Okay"
- Start the "MIMEMail utility"
As soon as the MIMEMail is started, it tries to connect to the
iSeries server via iSeries Access fcor Windows.
If more than one iSeries was defined to iSeries Access for Windows,
you will be asked to select one of them:
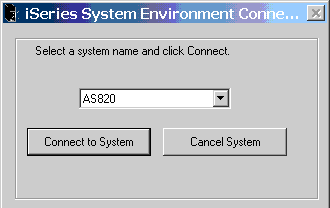
Figure 1- Selecting the iSeries
Next, you are asked to sign on:
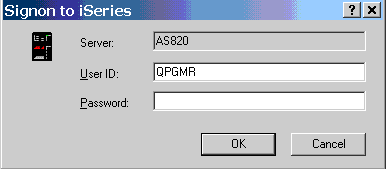
Figure 2- Signing on via iSeries Access for Windows
The utility then appears as follow:
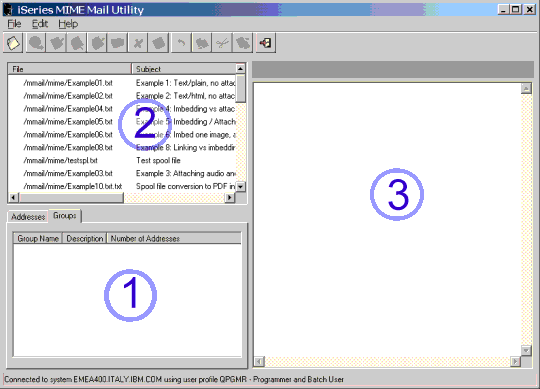
Figure 3- The three subwindows of the utility
The utility contains three subwindows:
- Addresses Repository.
It contains a public "Address Book" and a public "Group Book".
The "Address Book" is used to register / retrieve single
addresses. The "Group Book" is used to make up distribution
lists.
- MIME Files Repository (MFR).
This is a public repository of MIME messages ready to be mailed.
You may add other existing MIME messages to this repository
or create new ones
- Workarea.
It is used to create, browse, and edit MIME messages.
About the menubar

There are three menus in the menubar:
- File
- Send - Send a MIME message
- New - Define a new MIME message
- Properties - Display/change properties of a selected object
- Delete - Delete a selected object
- Display - Display a selected MIME message
- Edit - Edit a selected MIME message
- Open - Open a selected MIME message via Outlook.
This feature allows for an immediate test of a MIME message.
- Save - Save an edited MIME message
- Exit - Exit the application
- Edit - to be used when editing a MIME message
- Undo, Copy, Cut, Paste, Select all
- Help
- Contents: a nice online user manual
- About: general information about this program
About the toolbar

The tool bar is made of thirteen buttons divided in four groups.
From left to right:
- Group 1
- Create a new item
- File document- Document an existing MIME message into the MIME
messages archive
- MIME file - Create a new MIME message
- Address - Create a new Address entry
- Group - Create a new Group entry
- Group 2- Actions on a selected item
- Send the selected MIME message
- Display the properties of the selected MIME message
- Display the selected MIME message
- Edit the selected MIME message
- Open the selected MIME message via Outlook
- Delete the select item (MIME message, address or group): confirmation requested
- Save the MIME message currently being edited
- Group 3- Actions while editing a MIME message
- Undo the last operation performed on
the MIME message currently being edited
- Copy selected text from
the MIME message currently being edited
- Cut selected text from
the MIME message currently being edited
- Paste clipboard into
the MIME message currently being edited
- Group 4-
- Exit application
2. Working with the Address Repository
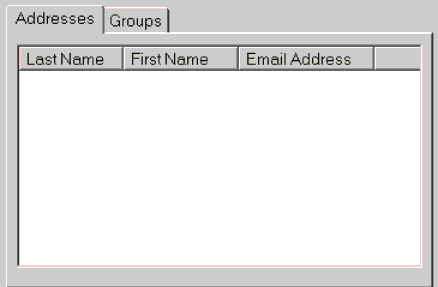
Figure 4- Address Repository
2.a - Single Addresses
| |
To define a single address
- click on the "Addresses" tab (Figure 4)
- click right in the middle of the subwindow:
the pull down "New, Properties, Delete" appears
- click on "New" to display the "Address Properties" box,
fill in the data, and press the "Okay" button (Figure 5)
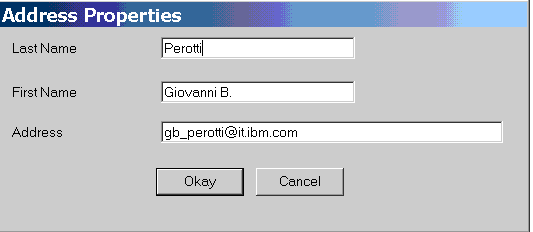
Figure 5- Address Properties box
This is the way to populate the Address Book.
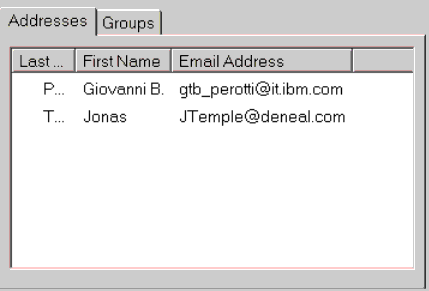
Figure 6- A populated Address Book
To update a single address
- select the address, by left click, until it
is shown on a blue background
- right click to display the pulldown
"New, Properties, Delete"
- select "Properties" to display the
"Properties" box
(see Figure 5)
- change the data as appropriate and press the
"Okay" button
Another way would be that of just double clicking
on the address line.
To remove a single address
- select the address, by left click, until it
is shown on a blue background
- right click to display the pulldown
"New, Properties, Delete"
- select "Delete" to display the
"Confirm Address Delete" box
|
2.b - Groups
| |
A group Distribution List) is a collection of single addresses.
Up to 1,000 addresses are allowed in a group.
To define a group
- click on the "Group" tab
(see Figure 4)
- click right in the middle of the subwindow:
the pull down "New, Properties, Delete" appears
- click on "New" to display the "Group Properties" box,
fill in the data, and press the "Okay" button (Figure 7)
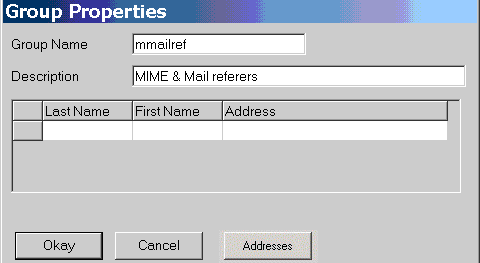
Figure 7- Properties of a group
To add entries to a group
- click on the "Group" tab
(see Figure 4)
- click to select the group you want to work with
(its background becomes blue)
- click right to display the pulldown
"New, Properties, Delete" and select "Properties"
- scroll down to the last entry (the one with
blank fields)
- click on "Last name" and enter the last name,
tab to "First name" and enter it,
tab to "Address" and type it,
then tab again to create a new empty line.
- add more entries, if you need to
- click on the "Okay" button when you are finished.
You may also click on the "Addresses" button and
check the single addresses to be added to the group.
To change / remove an entry from a group
- click on the "Group" tab
(see Figure 4)
- click to select the group you want to work with
(its background becomes blue)
- click right to display the pulldown
"New, Properties, Delete" and select "Properties"
- scroll until the entry you are looking for
(you may click left on each the header line column
to order the entries in ascending or descending mode)
- update the fields as needed, or
blank them all to remove the entry
Another way to apply a change would be that of
double clicking on a group line.
|
3. Working with MIME files Repository
The "MIME files Repository" is a public repository of MIME messages
ready for being mailed to anyone.
Facilities are provided to create, document, remove, and mail
repository messages (files).
MIME files on the iSeries are IFS (stream) files
containing messages MIME (Multipurpose Internet Mail
Extensions) compliant.
MIME files may of course exist in any IFS directory.
In this utility, the MIME File Repository cares only for
- MIME files in path
/mmail/mime
- MIME files in other paths, which are documented
to the repository through the utility itself.
Note 2.
All MIME files created via this utility are saved in path
/mmail/mime.
They therefore belong to the MIME File Repository.
3.a - Documenting an existing MIME file
| |
Documenting a MIME file (existing in a path different from
/mmail/mime) allows it
to be available to the public through the MFR
(Mime File Repository). To do it:
- right click in the MFR area
(see Figure 1)
to display the pulldown
"Send, New, Properties, Delete, Display, Edit, Open"
- select "New", then "File document"
to display the "Add New File Document" box
- fill in the data and click the "Okay" button
(see Figure 7)
(instead of steps "i" and "ii", you could more simply
select "File -> New -> File document"
from the menubar)
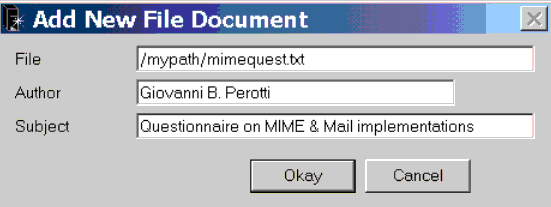
Figure 8- Documenting an existing MIME file
|
3.b - Changing MIME file properties
| |
To change the description and / or the author
of a MIME file documented in the MFR:
- click to select the file in the MFR area
(see Figure 2):
the line background turns to blue
- right click
to display the pulldown
"Send, New, Properties, Delete, Display, Edit, Open"
- select "Properties"
to display the "MIME File Properties" (see Figure 9)
change them as appropriate and click the "Okay" button
A second way would be that of just double clicking
on the MIME file line.

Figure 9- Changing properties of a MIME file
|
3.c - Testing a MIME file
| |
Usually, to test a MIME file you should e-mail it to you
and check how it is displayed by your mailer.
However, if have installed Outlook or Outlook-Express,
you may more easily open your file through it in
order to perform an immediate test.
Operate as follow:
- click to select the file in the MFR area
(see Figure 3):
the line background turns to blue
- right click
to display the pulldown
"Send, New, Properties, Delete, Display, Edit, Open"
- select "Open" to start Outlook versus this MIME file
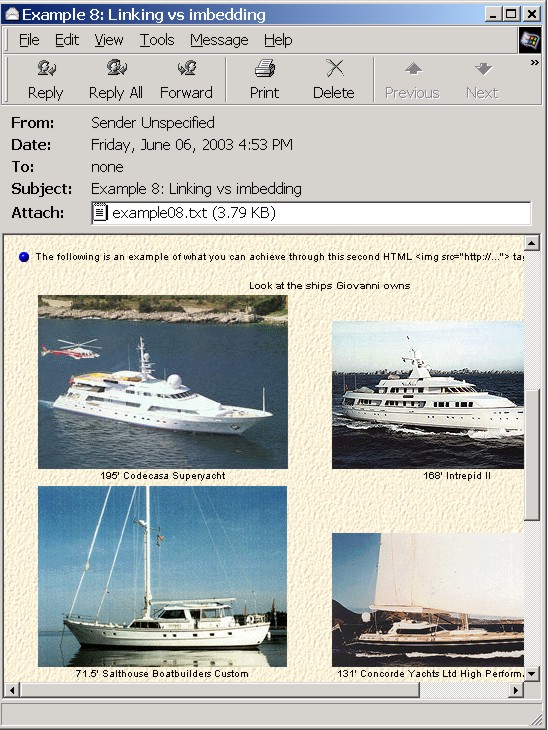
Figure 9a- Testing a MIME via Outlook
|
3.d - Deleting a MIME file
| |
To remove
a MIME file from the MFR:
- click to select the file in the MFR area
(see Figure 3):
the line background turns to blue
- right click
to display the pulldown
"Send, New, Properties, Delete, Display, Edit, Open"
- select "Delete"
to display the "Confirm File Delete" box.
Select "Yes" to un-document the file from the MFR
- you will receive the "Confirm Delete IFS object":
if you select "Yes" the file will also be deleted.
(Instead of steps "ii" and "iii" you could more simply
select "File -> Delete"
from the menubar)
|
3.e - Displaying a MIME file
| |
To display
a MIME file documented in the MFR:
- click to select the file in the MFR area
(see Figure 3):
the line background turns to blue
- right click
to display the pulldown
"Send, New, Properties, Delete, Display, Edit, Open"
- select "Display":
the MIME file is displayed in the work subwindow
(see Figure 10)
(Instead of steps "ii" and "iii" you could more simply
select "File -> Display"
from the menubar)
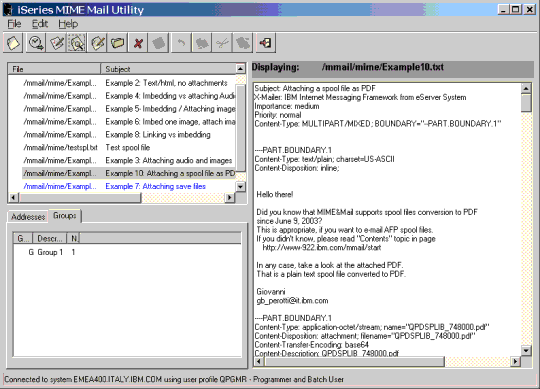
Figure 10- Displaying a MIME file
|
3.f - Editing a MIME file
| |
This function allows to edit (update)
a MIME file documented in the MFR.
Editing a MIME file is a rather dangerous operation,
as it could result in the MIME message not working
any longer.
- click to select the file in the MFR area
(see Figure 3):
the line background turns to blue
- right click
to display the pulldown
"Send, New, Properties, Delete, Display, Edit, Open"
- select "Edit":
the MIME file is edited in the work subwindow
(see Figure 11)
where you can change the text the way you like it.
(Instead of steps "ii" and "iii" you could more simply
select "File -> Edit"
from the menubar.)
Please note that buttons in the
toolbar
allow the following operations:
- Edit the selected MIME message
- Save the MIME message currently being edited
- Undo the last operation performed on
the MIME message currently being edited
- Copy selected text from
the MIME message currently being edited
- Cut selected text from
the MIME message currently being edited
- Paste clipboard into
the MIME message currently being edited
Similar functions - plus a "Select all" - are provided from the "Edit"
pulldown in the menubar.
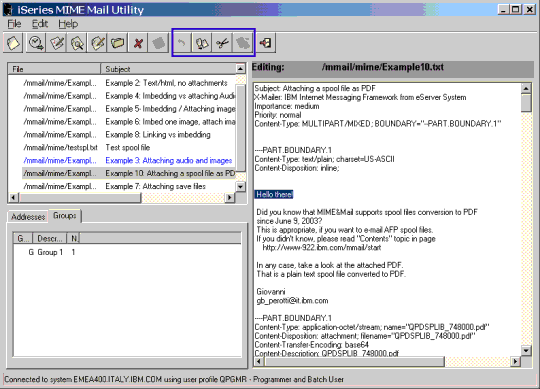
Figure 11- Editing a MIME file
Assigning Content-ID references
There might be cases where the text of the MIME message
needs to reference attachments. This is usually done
in the MIME text with tags like
<img src="cid:content_id">
and in the attachments with
Content-ID: <content_id>
where content_id are unique identifiers that make up
the link.
Within MIME & MAIL, these identifiers have the format
nnn@mime.mail
(nnn=1-999)
(see also here).
When editing a MIME file, you may click right to display the
pulldown
Undo, Copy, Cut, Paste,
Select All, Content ID Resolution .
If you are using the Content-ID technique, by selecting
"Content ID resolution", you will start a routine that:
- finds out all the Content-ID's of the attachments
- goes across all the "src=cid" tags in the text, and for each
of this prompts you the links resolution, in such a
way that you may very easily change the link to anyone
of the available attachments.
|
4. Creating a MIME file
4.a - Identifying the MIME file
| |
- right click in the MFR area
(see Figure 1):
to display the pulldown
"Send, New, Properties, Delete, Display, Edit, Open".
- Select "New", then "MIME file" to display
the "Create a New MIME File" box (Figure 12)
- Type the name of the file, without
specifying its path and extension (the file
will be created on the iSeries in path
/mmail/mime
and will be given the extension
.txt)
- Type the subject of the message
- Select the desired values for
"Importance", "Priority", and "Sensitivity"
(Instead of steps "i" and "ii" you could more simply
select "File -> New -> MIME file"
from the menubar.)
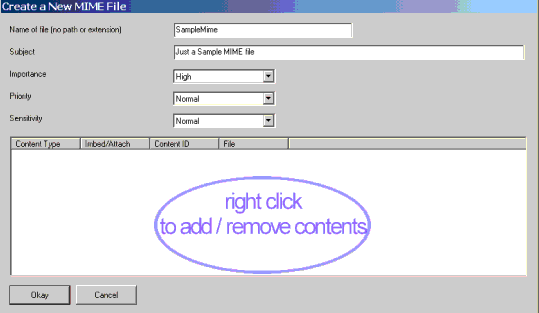
Figure 12- Identifying a new MIME file
|
4.b - Adding contents
| |
- right click in the area indicated in Figure 12
to display the pulldown ("Open", "Add", "Delete")
- select "Add" to display the list of available
content-types (Figure 13)
Note 3. Special content-types
While some content-types are obvious, other
deserve some explanations.
- text/plain is for monospace
characters, and is very easy to use
- text/html allows you to key in
your message as if it were an HTML page
- text/source-member allows to
pick up an iSeries source member
- text/database-file allows to
pick up an iSeries database file
(leftmost 2,000 bytes)
- text/spool allows to pick up
an iSeries spool file
- other allows to specify any
other non-selectable type of binary
object, as an example, an iSeries
save file.
|
| text/plain |
| text/html |
| text/quoted-printable |
| text/source-member |
| text/database-file |
| text/spool |
| image/gif |
| image/g3fax |
| image/ief |
| image/jpeg |
| image/tiff |
| audio/basic |
| audio/32kadpcm |
| video/mpeg |
| other |
|
Figure 13. Available content-types
|
- For instance, suppose you selected content-type
text-plain.
You would then receive the box in Figure 14,
where you have to specify
- path and name of the file to embed / attach.
You may use the button "..." (in the
blue circle) to browse and select the file you
want. Both local and network files can be
specified
- whether you want to embed or attach the file
- an optional Content-Id(entifier);
content identifiers are integers greater than zero
and are used to reference objects within a MIME file
(see also here).
Click the "Okay" button to embed / attach this
piece of contents.

Figure 14- Embedding/attaching a piece of contents
- Assume now that you want to attach an image
residing on the iSeries. Select type "image/jpeg"
and use the button "IFS" to select
the appropriate file from the IFS
(Figure 15)

Figure 15- Embedding/attaching another piece of contents
- You should notice that any time a new piece of
contents is added, it is listed in the MIME file
status area (Figure 16)
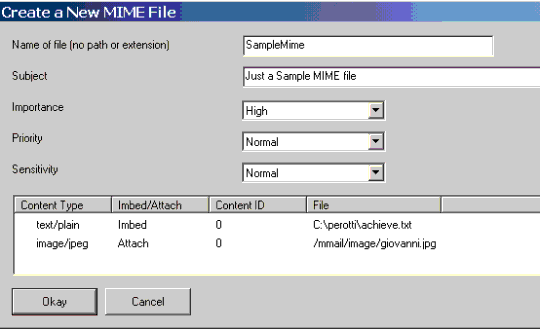
Figure 16- Current status of the MIME file being created
- Should you care for displaying / editing a
piece of contents
- click to select it
- right click to display the pulldown ("Open", "Add", "Delete")
and select "Open"
- Should you change your mind and want to remove a
piece of contents
- click to select it
- right click to display the pulldown ("Open", "Add", "Delete")
and select "Delete"
- When you are finished adding contents,
click on the "Okay" button to generate the
MIME file.
|
5. Sending a MIME file
- Right click on the MIME file to send, and select "Send"
from the pull down. The following shows up:
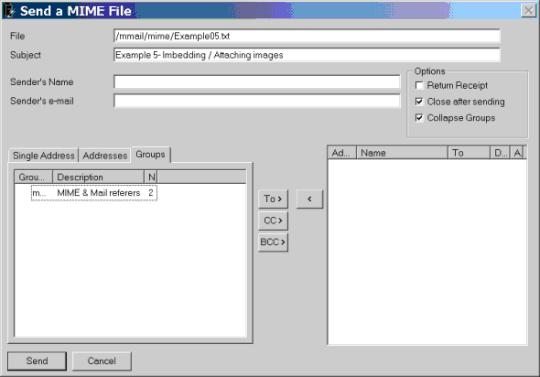
Figure 17- Send a MIME file
- Fill in the sender's name:
it would be correct to enter your name,
but any name is valid, provided it is not blank.
- Fill in the sender's e-mail:
it would be correct to enter your e-mail address
(exspecially if you are looking for replies),
but any e-mail address is valid, provided it has the
appropriate syntax (xxx@yyy.zzz)
- Check the options you want:
- Return receipt:
if you check this box,
when a recipient opens your message, a receipt will
be returned to the sender's e-mail
- Close after sending:
check this option to close this box
after sending (uncheck this option
if you want the box to stay open for further sendings)
- Collapse groups:
if you are sending this message to groups
check this option in order to avoid all the individual
addresses in each group be displayed to recipients.
This is what you need to protect privacy
and prevent spamming.
- Specify the recipients of this message.
There are three ways you can specify recipients:
- "Ad hoc" recipients, by clicking on the
"Single address" tab
- Selecting recipients from the Address Book, by clicking
on the "Addresses" tab
- Selecting Groups, by clicking on the
"Groups" tab
- For each recipient or Group selected, you must specify
the destination type, by clicking one of the buttons
By doing this, recipients are copied to the distribution
subwindow (bottom right)
- To remove a single recipients from distribution,
select it and press the "<" button
- To clear the whole distribution, right click on the
distribution subwindow and select "Remove all"
- When finished, press the "Okay" button to perform the
sending.
|

